Battery switch on travel trailer function is crucial for managing your RV’s power. Understanding how your battery switch works – whether it’s a simple single-pole or a more complex double-pole setup – is key to preventing dead batteries and protecting your valuable appliances. This guide breaks down the different types of switches, their installation, operation, maintenance, and troubleshooting, ensuring you’re confident in managing your travel trailer’s power system.
We’ll explore the various switch types, their placement within your RV, and the step-by-step process of installation and maintenance. We’ll also cover safety precautions, common problems, and how your battery switch interacts with other systems like solar panels and inverters. By the end, you’ll be a battery switch pro!
Battery Switch Types in Travel Trailers
Choosing the right battery switch for your travel trailer is crucial for managing power, protecting your batteries, and ensuring safe operation. Different switches offer varying levels of control and safety features, making the selection process important for both novice and experienced RVers. This section details the common types, their mechanisms, and their respective pros and cons.
Single-Pole Battery Switches
A single-pole battery switch is the simplest type. It’s essentially a single on/off switch that controls the connection between your battery and the trailer’s electrical system. Internally, it uses a simple mechanism: a lever or button that moves a contact arm to either connect or disconnect the circuit. When the switch is “on,” the circuit is closed, allowing power to flow from the battery to the trailer.
When “off,” the circuit is broken, preventing power flow. These switches are inexpensive and easy to install, but offer minimal protection.
Double-Pole Battery Switches
Double-pole switches offer improved safety and control compared to single-pole switches. They control two circuits simultaneously. This is commonly used to isolate both the positive and negative battery terminals from the trailer’s electrical system, providing a more complete disconnect. The internal mechanism is similar to a single-pole switch, but with two separate contact arms and circuits controlled by a single lever or button.
This setup offers better safety, preventing accidental shorts.
Disconnect Switches, Battery switch on travel trailer function
Disconnect switches, often referred to as battery disconnect switches, are designed for complete isolation of the battery from the trailer’s electrical system. These switches usually feature a keyed mechanism for added security, preventing unauthorized access. Internally, these switches use a robust mechanism that reliably disconnects both the positive and negative terminals, offering a higher level of safety than single or double-pole switches.
Comparison of Battery Switch Types
| Feature | Single-Pole | Double-Pole | Disconnect Switch |
|---|---|---|---|
| Number of Circuits Controlled | One | Two (positive and negative) | Two (positive and negative), often with keyed lock |
| Safety | Low | Medium | High |
| Cost | Low | Medium | High |
| Maintenance | Low | Low | Low |
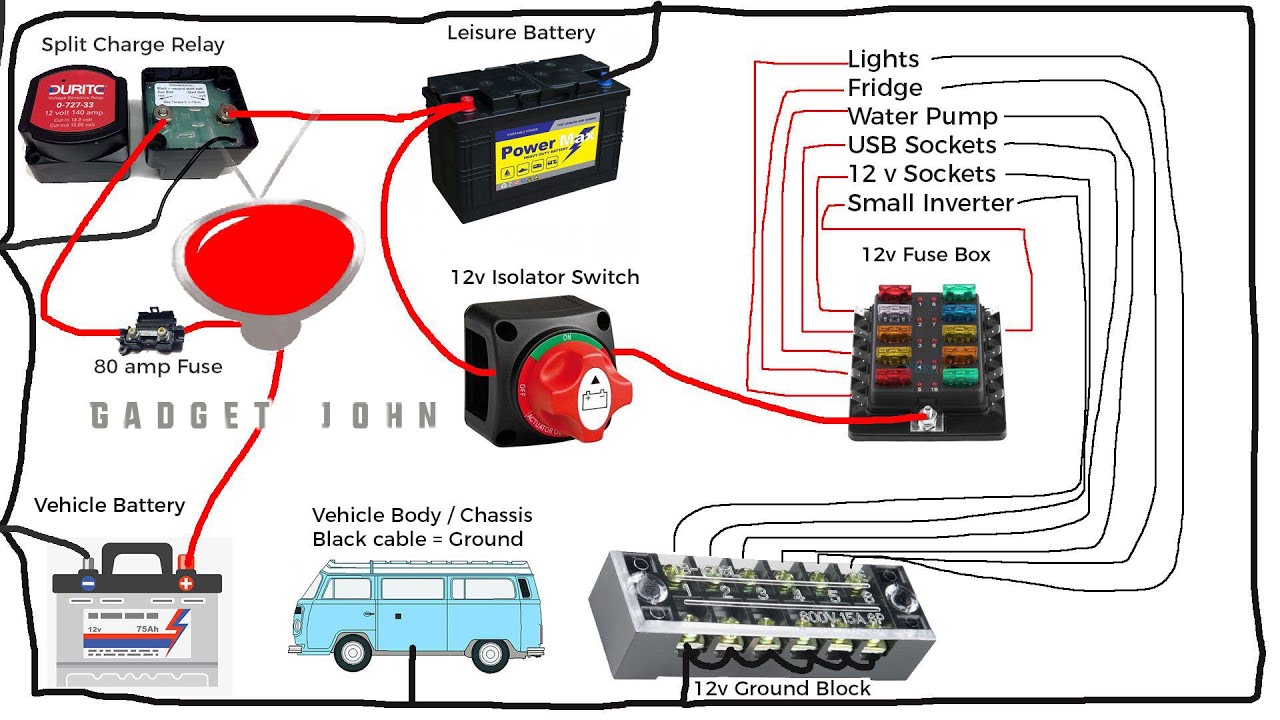
Battery Switch Location and Installation: Battery Switch On Travel Trailer Function

Finding the right spot for your battery switch in your travel trailer is crucial for both safety and convenience. Ideally, it should be easily accessible but also protected from the elements and potential damage. Proper installation ensures reliable operation and prevents electrical hazards.Typical locations for battery switches in travel trailers prioritize ease of access for disconnecting the battery in emergencies or for extended storage, while also considering protection from moisture and accidental contact.
Common spots include inside a compartment near the battery itself (but not directly on top of it), within a dedicated electrical panel, or in a lockable storage area under a bench or seat, offering a degree of security and weather protection. The specific location will depend on the trailer’s design and available space.
Battery Switch Installation Steps
Installing a battery switch correctly is vital for safety and the longevity of your electrical system. Improper installation can lead to short circuits, fires, or even injury. Always disconnect the battery’s negative terminal before beginning any work.
- Preparation: Gather your tools (screwdriver, wire cutters/strippers, wire connectors, protective gloves), the battery switch itself, and any necessary wiring. Ensure the area is well-ventilated and you have adequate lighting.
- Mounting the Switch: Securely mount the battery switch to a sturdy surface using appropriate screws and hardware. The chosen location should be easily accessible yet protected from moisture and accidental damage. Ensure that the mounting screws don’t interfere with the switch’s operation.
- Wiring Connections: Connect the positive (+) cable from your battery to the input terminal of the battery switch. Use appropriately sized wire connectors to create secure and corrosion-resistant connections. Always follow the manufacturer’s instructions for wire gauge and connector type. Next, connect the output terminal of the battery switch to the positive (+) terminal of your trailer’s electrical system.
- Negative Cable Connection: Connect the negative (-) cable from your battery directly to the chassis of the trailer, ensuring a clean, solid connection. Do not run the negative cable through the battery switch. This is a critical safety measure to prevent sparks and potential fires if the switch malfunctions.
- Testing: After making all connections, carefully test the switch by turning it on and off. Verify that the trailer’s electrical systems are functioning correctly and that the switch is controlling the power flow as expected. Use a multimeter to check for any short circuits or voltage drops.
- Securing Wires: Secure all wiring with cable ties or other appropriate fasteners to prevent movement or damage. Ensure all connections are neatly organized and well-protected.
Safety Hazards of Improper Installation
Improper installation of a battery switch poses several significant safety hazards. These include:* Short Circuits: Loose or improperly connected wires can cause short circuits, leading to overheating, melting insulation, and potentially fire.
Electrical Shocks
Improper wiring can result in exposed live wires, posing a risk of serious electrical shock.
Battery Explosions
Incorrect connections or a faulty switch can lead to sparks near the battery, potentially causing a battery explosion.
System Malfunctions
A poorly installed switch can lead to intermittent power loss or complete failure of the trailer’s electrical system.
Diagram of Safe Battery Switch Installation
The diagram depicts a battery located in a compartment under a bench. A heavy-duty battery switch is mounted securely to the compartment wall, away from the battery itself and protected from moisture. The positive (+) cable from the battery runs directly to the input terminal of the switch using appropriately sized wire and connectors. The output terminal of the switch connects to the positive (+) bus bar of the trailer’s electrical system, also with properly sized wiring and connectors.
The negative (-) cable from the battery connects directly to the trailer’s chassis ground point, separate from the battery switch. All wiring is secured using cable ties to prevent movement and potential short circuits. The switch is clearly labeled and easily accessible for convenient operation. The compartment itself is well-ventilated to prevent the buildup of flammable gases.
Battery Switch Functionality and Operation
A battery switch in your travel trailer acts as a central control for your trailer’s battery power. It allows you to disconnect your house batteries from the rest of the trailer’s electrical system, preventing unwanted drain and protecting sensitive electronics. Understanding its function and proper operation is crucial for maintaining your RV’s electrical system and preventing costly repairs.The battery switch’s primary function is to manage the flow of power from your trailer’s batteries to the various appliances and systems within the RV.
When the switch is in the “ON” position, power flows freely from the batteries, allowing you to use lights, appliances, and other 12-volt devices. Switching it to the “OFF” position completely isolates the batteries, cutting off all power to prevent discharge when the trailer isn’t in use. Some switches offer a third position, often labeled “Start,” which allows you to power the engine starting system while keeping the house batteries isolated.
So, you’re an audiophile who loves to travel? Awesome! Check out this guide on building the perfect audiophile travel setup to keep your tunes sounding amazing on the go. It’s crucial to protect your gear, and yourself, while you’re adventuring, so don’t forget to sort out travel insurance. Getting Aon travel insurance before you leave is a smart move; you’ll have peace of mind knowing you’re covered for unexpected events.
Enjoy the journey and the music!
Safe Operation of the Battery Switch
Turning the battery switch on and off is a straightforward process, but safety precautions are vital. Before manipulating the switch, ensure your hands are dry and that you’re not standing in water or on a damp surface. Always visually inspect the switch and its connections for any signs of damage or corrosion before use. Turn the switch slowly and firmly to the desired position, ensuring it clicks securely into place.
Never force the switch. If it feels stiff or difficult to operate, investigate the cause before proceeding. After turning the switch off, always double-check that power is disconnected by attempting to use a power-drawing device; if it doesn’t work, the switch is off.
Preventing Battery Drain and Protecting Electrical Components
The battery switch plays a critical role in preventing battery drain. When your trailer is stored for extended periods, turning the switch to the “OFF” position completely isolates the house batteries, preventing parasitic drain from things like clocks, carbon monoxide detectors, or other small devices that draw power even when turned off. This prevents your batteries from completely discharging and becoming unusable.
Moreover, the switch helps protect your electrical components from damage. By disconnecting the batteries, it prevents voltage spikes or surges that could occur due to faulty wiring or other electrical issues. This protective function is particularly beneficial during storage or transport.
Troubleshooting Common Battery Switch Problems
If you’re experiencing problems with your battery switch, several common issues might be the cause. No power to the trailer’s 12-volt system when the switch is in the “ON” position could indicate a blown fuse in the switch itself, a faulty switch, or a problem with the battery connections. Inspect the fuse first; if it’s blown, replace it with a fuse of the same amperage rating.
If the problem persists, the switch itself might be faulty and require replacement. Flickering lights could indicate a loose connection at the switch, corroded terminals, or a low battery charge. Clean and tighten all connections, and check the battery voltage. If the voltage is low, recharge the batteries. If problems persist after these checks, consult a qualified RV technician.
Maintaining and Troubleshooting the Battery Switch
Keeping your travel trailer’s battery switch in good working order is crucial for reliable power. Regular maintenance prevents unexpected failures and ensures your batteries are properly managed, extending their lifespan and avoiding costly repairs down the road. Neglecting maintenance can lead to dead batteries, inconvenient power outages, and even potential damage to your trailer’s electrical system.
Battery Switch Maintenance Schedule
A simple maintenance schedule will help keep your battery switch functioning correctly. This involves visual inspections and periodic cleaning to remove corrosion and debris. Failing to perform these checks can lead to poor connections and eventual failure of the switch itself.
- Monthly Inspection: Visually inspect the switch for any signs of corrosion, loose connections, or damage to the wiring. Pay close attention to the terminals and the switch body itself. Look for any signs of overheating, such as discoloration or melting of plastic components.
- Quarterly Cleaning: Use a wire brush to clean any corrosion from the battery terminals and the switch terminals. Apply a corrosion inhibitor to the terminals after cleaning to prevent future corrosion. This is especially important in humid or salty environments.
- Annual Deep Cleaning: Disconnecting the battery switch (after ensuring the batteries are disconnected) allows for a more thorough cleaning. Use a degreaser and a stiff brush to clean the switch and surrounding area. Re-apply corrosion inhibitor to all connections after cleaning and drying.
Common Battery Switch Failures and Solutions
Several issues can cause your battery switch to fail. Understanding these common problems and their solutions will allow you to troubleshoot effectively and minimize downtime.
- Corrosion: Corrosion on the terminals is the most common cause of battery switch failure. This prevents proper electrical contact, leading to poor performance or complete failure. Solution: Clean the terminals thoroughly with a wire brush and apply a corrosion inhibitor.
- Loose Connections: Loose connections can result in intermittent power or complete power loss. Vibration from travel can loosen connections over time. Solution: Tighten all connections securely. If necessary, replace loose or damaged wiring.
- Internal Switch Failure: The switch mechanism itself can fail due to wear and tear or exposure to the elements. Solution: Replacement of the entire battery switch is necessary in this case.
- Wiring Issues: Damaged or improperly wired connections can also cause battery switch malfunctions. Solution: Inspect all wiring for damage and repair or replace any faulty wiring. Consult a qualified electrician if you are not comfortable working with electrical systems.
Tools and Materials for Battery Switch Maintenance and Repair
Having the right tools readily available makes maintenance and repairs easier and safer.
- Wire brush
- Corrosion inhibitor (e.g., dielectric grease)
- Screwdrivers (Phillips and flathead)
- Wrench (appropriate size for terminals)
- Degreaser (optional, for deep cleaning)
- Replacement battery switch (if needed)
- Electrical tape (if needed)
- Safety glasses
- Work gloves
Replacing a Faulty Battery Switch
Replacing a battery switch requires careful attention to safety. Always disconnect the batteries before starting any work on the electrical system.
So, you’re an audiophile who loves to travel? Awesome! Check out this guide on creating the perfect audiophile travel setup to ensure your ears are happy on the road. It’s crucial to protect yourself while traveling, too, so make sure you’ve got solid travel insurance sorted. Consider looking into Aon travel insurance for comprehensive coverage; you don’t want any unexpected issues to ruin your trip.
With great sound and peace of mind, you’re set for an amazing adventure!
- Disconnect the Batteries: This is the most crucial safety step. Disconnect both positive (+) and negative (-) terminals from the batteries.
- Remove the Old Switch: Carefully disconnect the wires from the old switch, noting their positions for reconnection. Unscrew the switch from its mounting location.
- Install the New Switch: Mount the new switch in the same location as the old one. Connect the wires to the new switch, ensuring they are in the correct positions. Tighten all connections securely.
- Reconnect the Batteries: Carefully reconnect the positive (+) and negative (-) terminals to the batteries.
- Test the Switch: Turn the switch on and off to verify its operation. Check all lights and appliances to ensure they are receiving power.
Battery Switch and its Relation to Other Trailer Systems
Your travel trailer’s battery switch isn’t just an on/off switch; it’s a crucial component that manages power flow and protects your electrical systems. Understanding its interaction with other systems like solar panels, converters, and inverters is vital for safe and efficient operation. This section will explain how the battery switch impacts these systems and how to utilize it for maintenance and troubleshooting.The battery switch acts as a central control point, determining which circuits receive power from your house batteries.
Different battery switch configurations significantly impact how your trailer’s electrical systems function. For instance, a simple on/off switch provides basic control, while more advanced switches offer multiple banks and the ability to isolate specific circuits.
Battery Switch Interaction with Solar Panels
Solar panels generate DC power and typically charge the house batteries directly. With the battery switch in the “on” position, this charged power is available to all connected systems. If the switch is “off,” the solar panels will still charge the batteries, but the power won’t be accessible to the trailer’s appliances. Some more sophisticated systems might include a bypass feature, allowing solar charging even with the switch off, ensuring battery charging continues regardless of the switch position.
This is particularly useful for maintaining battery charge during storage.
Battery Switch Interaction with Converters
Converters transform 12V DC power from the batteries into 120V AC power for household appliances. The converter only functions when the battery switch is on and the batteries are connected to the system. Turning the switch off interrupts the power supply to the converter, preventing AC power from being generated and protecting your appliances from damage.
Battery Switch Interaction with Inverters
Inverters also convert 12V DC power to 120V AC, but unlike converters, they’re typically used for higher-power appliances or to run AC devices when not connected to shore power. The battery switch acts the same way as with converters; switching it off cuts the power supply to the inverter, preventing it from functioning.
Using the Battery Switch for Isolation
The battery switch is invaluable for isolating specific circuits during maintenance or repairs. By turning the switch off, you completely disconnect the batteries, ensuring safety while working on any part of the electrical system. This prevents accidental shocks or short circuits. More advanced switches allow isolating specific battery banks or even individual circuits, further enhancing safety and facilitating targeted troubleshooting.
Power Flow within a Travel Trailer System
Imagine a flowchart. At the top, we have the power source: either shore power (connected to an external power source), solar panels, or the generator. These sources feed into a distribution panel. From the distribution panel, a pathway leads to the battery switch. The battery switch acts as a gatekeeper.
When “on,” it allows power to flow from the batteries (charged by the solar panels, generator, or shore power) to the rest of the trailer’s electrical system. This system includes the converter (which provides 120V AC power for some appliances), the inverter (for higher-power AC demands), and the various circuits powering lights, water pumps, and other appliances. A separate branch from the distribution panel feeds directly to some appliances, bypassing the battery switch.
This might include the 120V AC outlets directly powered by shore power when connected. When the battery switch is “off,” the power flow from the batteries to the rest of the system is interrupted, though the solar panels might still charge the batteries. A path from the distribution panel also leads to any external power sources like shore power, which bypasses the battery switch.
This enables power to the trailer even if the battery switch is off. Finally, each appliance or circuit has its own breaker or fuse for added protection.
Mastering your travel trailer’s battery switch is about more than just flipping a switch; it’s about understanding your RV’s power system and ensuring a safe and enjoyable camping experience. By following the maintenance schedule, troubleshooting tips, and safety precautions Artikeld here, you can confidently manage your power and avoid costly repairs. So get out there, explore, and enjoy the freedom of the open road, knowing your RV’s power is under control!
Query Resolution
What happens if I leave my battery switch on all the time?
Leaving your battery switch on constantly can drain your batteries, especially if you have parasitic draws (small appliances consuming power even when turned off). This can lead to a dead battery and potentially damage to your electrical components.
How do I know if my battery switch is bad?
Symptoms of a bad battery switch include no power to your appliances, flickering lights, or a consistently low battery charge despite charging. A visual inspection for corrosion or loose connections can also help identify problems.
Can I install a battery switch myself?
While possible, installing a battery switch yourself requires electrical knowledge and safety precautions. If you’re unsure, it’s best to consult a professional RV technician.
How often should I clean my battery switch?
Inspect your battery switch regularly for corrosion and clean it with a wire brush and baking soda paste at least once a year, or more often in humid climates.
